Home Blog Page 36

How to Add͏ a Custom͏ ͏Net͏work͏ to Met͏aMask

0

MetaMask has established itself as a go-to cryptocurrency wallet for anyone interested in Ethereum and blockchain technology. However, many users are unaware of the incredible versatility that MetaMask offers—specifically, its ability to connect to custom networks beyond the Ethereum Mainnet. Whether you want to explore the Binance Smart Chain (BSC), Polygon, Avalanche, or any other blockchain, adding custom networks to MetaMask can significantly broaden your crypto experience.

Why Add Custom Networks to MetaMask?

MetaMask is defaulted to the Ethereum Mainnet, which is great if you’re only interested in Ethereum and ERC-20 tokens. However, the crypto world is vast, and several other blockchains offer unique advantages, whether it’s lower fees, faster transactions, or access to exclusive DApps and tokens. Here’s why adding custom networks to MetaMask is a smart move:

Access to Multiple Blockchains

Adding custom networks allows you to interact with various blockchains, each offering different features and assets.

Lower Transaction Fees

Some networks, like Binance Smart Chain and Polygon, offer significantly lower transaction fees compared to Ethereum, making them attractive for users who frequently move assets around.

DApp Compatibility

Certain decentralized applications are exclusive to specific networks. By adding those networks to MetaMask, you can use these DApps directly from your wallet.

Investment Opportunities

With access to different blockchains, you can diversify your investments by acquiring tokens that aren’t available on Ethereum.

Custom Networks On Metamask

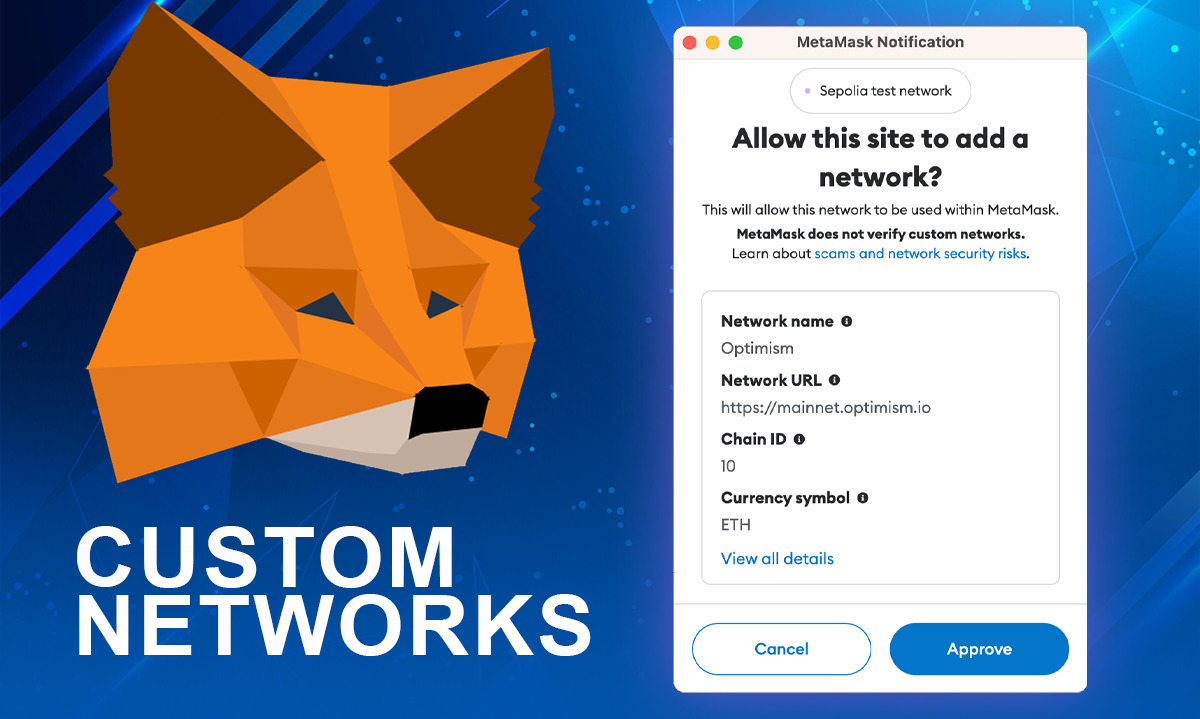
Step 1: Install MetaMask

Before diving into custom networks, ensure that you have MetaMask installed on your browser. MetaMask is available as an extension for Chrome, Firefox, and Brave. Here’s how to get started:

  1. Visit the MetaMask Website: Navigate to metamask.io and click on the download button that corresponds to your browser.
  2. Install the Extension: Follow the installation prompts, and once complete, you should see the MetaMask fox icon in your browser’s toolbar.
  3. Set Up Your Wallet: If this is your first time using MetaMask, you’ll be guided through the wallet setup process. Make sure to securely store your recovery seed phrase, as this is crucial for regaining access to your wallet if needed.

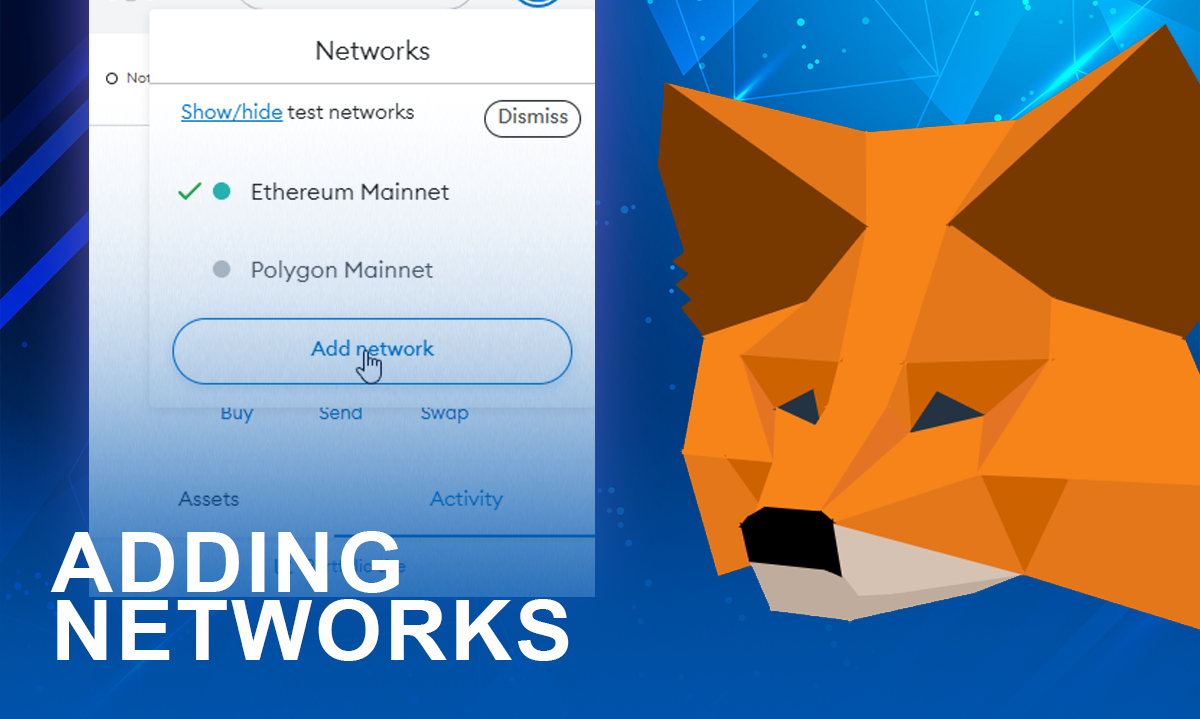
Step 2: Open the Network Dropdown Menu

With MetaMask installed, the next step is to access the network settings. Here’s how:

  1. Open MetaMask: Click on the MetaMask icon in your browser to open the wallet interface.
  2. Access the Network Dropdown: At the top of the interface, you’ll see the current network name (usually “Ethereum Mainnet”). Click on this to reveal a dropdown menu.
  3. Choose “Add Network” or “Custom RPC”: At the bottom of the dropdown menu, you’ll find options to add a new network. This is where you’ll configure your custom network.

Step 3: Collect Custom Network Details

To add a custom network, you’ll need specific information related to the network you wish to connect to. This usually includes:

  • Network Name: The name of the blockchain network (e.g., Binance Smart Chain).
  • RPC URL: The URL through which MetaMask will communicate with the network (e.g., https://bsc-dataseed.binance.org/).
  • Chain ID: A unique identifier for the blockchain (e.g., 56 for Binance Smart Chain).
  • Currency Symbol: The native currency symbol of the network (e.g., BNB for Binance Smart Chain).
  • Block Explorer URL (Optional): A URL to the network’s block explorer (e.g., https://bscscan.com/).

This information can usually be found on the network’s official website or documentation. Ensure that you get this data from reliable sources to avoid any connectivity issues.

Step 4: Input Network Information

Now that you have all the necessary details, it’s time to add the network to MetaMask:

  1. Enter the Network Name: In the appropriate field, type the name of the network (e.g., Binance Smart Chain).
  2. Paste the RPC URL: Copy and paste the network’s RPC URL into the designated field.
  3. Input the Chain ID: Type in the Chain ID specific to the network.
  4. Add the Currency Symbol: Enter the symbol for the network’s native currency (e.g., BNB).
  5. Optional – Block Explorer URL: If you have the block explorer URL, paste it into the corresponding field.

Double-check all the details before clicking “Save.” Any mistakes, particularly in the Chain ID or RPC URL, can prevent MetaMask from connecting to the network.

Step 5: Switch to Your New Network

Once you’ve saved the network details, it will be added to your list of available networks. Here’s how to switch to your new network:

  1. Open the Network Dropdown: Click on the network name at the top of the MetaMask interface.
  2. Select Your Custom Network: From the dropdown list, choose the network you’ve just added.

MetaMask will now connect to the selected network, allowing you to interact with it as you would with Ethereum.

Metamask adding networks

Step 6: Adding Custom Tokens

After connecting to a new network, you might notice that some tokens aren’t automatically displayed in your wallet. To manage these tokens, you’ll need to add them manually:

  1. Go to the Assets Tab: In MetaMask, navigate to the “Assets” tab.
  2. Select “Import Tokens”: Scroll down and click on the “Import Tokens” option.
  3. Input Token Details: You’ll need the token’s contract address, symbol, and decimals. This information is typically available on the network’s block explorer or the token’s official website.
  4. Add the Token: After entering the details, click “Add Custom Token.” The token should now appear in your wallet.

Step 7: Troubleshooting Common Issues

While adding a custom network is generally straightforward, you might encounter a few hiccups along the way. Here’s how to handle them:

  • Network Not Connecting: If MetaMask fails to connect to the network, double-check the RPC URL and Chain ID. Ensure that the network details are entered correctly.
  • Tokens Not Displaying: If tokens are not showing, make sure you’ve added them manually using the correct contract address.

Conclusion

Adding custom networks to MetaMask enhances your cryptocurrency experience by providing access to diverse blockchains and investment opportunities. By following this guide, you can effortlessly navigate through different networks and explore the vast world of decentralized applications.

How to Create a Phantom Wallet? A Simple Step-by-Step Beginner’s Guide

0

If you’re looking to store your Solana-based assets safely and access them with ease, the Phantom Wallet is a great choice. This wallet is at an all-time popularity peak for its user-friendly interface, solid security features, and smooth integration with decentralized applications (dApps) on the Solana blockchain. If you are still not convinced about if you should choose Phantom, let me tell you something interesting.

Phantom Wallet’s Explosive Growth

In a span of one year, from January 2023 to January 2024, the number of monthly active users (MAUs) for Phantom grew by 220%! They reached a whopping 3.2 million MAUs and recorded 463.5% more installs over the year, shooting the figure up to 167,000. Unbelievable, right? So, they must be doing something worthwhile to have that many crypto users trusting them. If you want to hop on the wagon too and reap the benefits of Phantom, let us handhold you through the entire process of setting up your Phantom Wallet, ensuring that you’re ready to manage your digital assets with confidence.

Why Choose Phantom Wallet?

Before we get started with the Phantom Wallet setup, let us understand why it has become a fan-favorite. First off, it is designed specifically for the Solana blockchain, which means all your speed and efficiency concerns are out the window. Phantom also has in-built features like in-wallet swaps, dApp integration, and staking, which are a major lacking in other basic storage solutions.

To top it off, Phantom is also a flagbearer for top-notch security. Your private keys are stored on your device and not on the internet, meaning you’re the only one who has access to your assets. This wallet supports hardware wallets for added security and is compatible with all major web browsers, ensuring you can access your assets from any corner of the world.

What Do You Need to Create a Phantom Wallet?

  • A device with a compatible web browser (Chrome, Firefox, Brave, or Edge).
  • A stable internet connection.
  • A secure place to store your recovery phrase.

Step 1: Install the Phantom Wallet Extension

  1. Open your web browser: Start by launching your preferred browser on your device.
  2. Visit the Phantom website: Head to Phantom’s official website. Do not trust any other third-party websites to redirect you here as fishy links might be waiting for you to come and entrust your assets.
  3. Click “Download”: On the website, you’ll find a button to download the Phantom Wallet extension. Click on it and choose your browser from the options provided.
  4. Add to browser: Once you’re redirected to the browser’s extension store, click on “Add to Chrome” (or whatever is the equivalent for your browser). Read through and confirm any prompts that appear to complete the installation.

Phantom Wallet Extension

Step 2: Create Your Phantom Wallet

  1. Launch the extension: After installation, you’ll see the Phantom icon in your browser’s toolbar. Click on it to open the wallet.
  2. Click “Create a new wallet”: You’ll be greeted with two options: “Create a new wallet” or “Use secret recovery phrase.” Since we’re setting up a new wallet, select the first option.
  3. Save your recovery phrase: Phantom will generate a 12-word recovery phrase, which is crucial for accessing your wallet if you lose access to your device. Write down this phrase on paper and store it in a secure place. Do not store it digitally to avoid potential hacks.
  4. Confirm your recovery phrase: To ensure you’ve noted down the recovery phrase correctly, Phantom will ask you to confirm it by entering a few of the words. This step is vital, as losing your recovery phrase means you’ll lose access to your wallet forever.
  5. Set a password: Next, create a strong password for everyday access to your wallet. This password adds an extra layer of security and will be required every time you open the wallet extension.
  6. Finish setup: After confirming your password, you’ll see a quick overview of the Phantom Wallet features. Once you’ve read through this, your wallet setup is complete!

Step 3: Add Funds to Your Phantom Wallet

  1. Get your wallet address: To receive funds, you’ll need your wallet address. Click on the Phantom extension icon and look for your wallet address at the top. It’s a long string of letters and numbers. Click on it to copy the address to your clipboard.
  2. Transfer funds: If you already have some SOL (Solana) or other SPL tokens on another wallet or exchange, you can send them to your Phantom Wallet using this address. Simply go to the send/withdraw section on the exchange or wallet, paste your Phantom address, and specify the amount to transfer.
  3. Check your balance: Once the transaction is complete, you should see your funds reflected in your Phantom Wallet. It’s that easy!

Step 4: Explore Phantom’s Features

Now that your wallet is set up and funded, it’s time to explore the features that make Phantom stand out.

  • In-wallet token swaps: Phantom allows you to swap tokens directly within the wallet. Click on the “Swap” tab, select the tokens you want to exchange, and confirm the transaction. It’s quick, easy, and convenient.
  • Staking SOL: If you hold SOL in your Phantom Wallet, you can stake it to earn rewards. Simply click on the “Staking” tab, choose a validator, and stake your SOL. You’ll start earning rewards, which will automatically compound over time.
  • Interact with dApps: Phantom is your gateway to the Solana dApp ecosystem. Whether you’re into DeFi, NFTs, or gaming, you can connect to dApps directly through your wallet. Just click “Connect Wallet” on any supported dApp, and Phantom will do the rest.

Step 5: Enhance Security with a Hardware Wallet

For those looking to maximize security, Phantom supports integration with hardware wallets like Ledger. By pairing your Phantom Wallet with a hardware device, you add an extra layer of protection to your assets.

  • Connect your hardware wallet: First, make sure your hardware wallet is set up and connected to your device. Open the Phantom Wallet and go to the settings menu.
  • Pair your device: Select “Connect Hardware Wallet” and follow the on-screen instructions. Once connected, you can manage your assets through Phantom, with your private keys securely stored offline on the hardware wallet.

Step 6: Backup and Restore Your Phantom Wallet

Backing up your wallet is crucial. We’ve already mentioned the importance of your recovery phrase, but let’s quickly review how you can use it to restore your wallet if needed.

  • Backup your recovery phrase: If you haven’t already, write down your recovery phrase and store it in a secure location. This phrase is your only way to regain access to your wallet if something happens to your device.
  • Restore your wallet: If you ever need to restore your wallet, you can do so by installing the Phantom Wallet extension on a new device and selecting “Use secret recovery phrase.” Enter your 12-word phrase, and your wallet will be restored with all your funds intact.

Phantom Wallet Security

Wrapping Up

The Phantom Wallet offers a perfect blend of ease of use, security, and powerful features tailored for the Solana blockchain. Whether you’re new to crypto or an experienced investor, Phantom makes managing your digital assets straightforward and secure. From in-wallet swaps to staking and dApp integration, Phantom has everything you need to confidently manage your Solana-based assets.

So, take the plunge and set up your Phantom Wallet today—it’s the key to unlocking the full potential of the Solana ecosystem!

One-Stop ͏Must-͏Know Tips f͏or Tru͏st ͏Wa͏llet ͏U͏sers

0

If there is one concern that plagues any newbie trying their luck in crypto, it is security. Or rather, the lack of it. In a world where mega-influencers like Kim Kardashian and Logan Paul advocate pump-and-dump schemes, trust becomes a fickle commodity. And that is exactly the gap Trust Wallet looks to bridge.

Getting Started with Trust Wallet

Staying true to its name, “Trust” Wallet has become a go-to choice for many crypto traders owing to its user-friendly interface, security features, and support for a wide range of digital assets. Whether you’re a seasoned investor or just starting out, understanding how to make the most out of Trust Wallet can significantly impact and benefit your crypto journey. To credit Trust Wallet’s booming popularity, statistics show that it ranks among the only top three wallets that were able to hit the million download mark in each quarter of 2023, all over the United States. So if you’re not trusting Trust already, you’re missing out big time.

Creating Your Trust Wallet

Trust Wallet is designed to be intuitive, making it easy for users to get started right away. You can start by downloading the app from the official app store on your device. After installation, you’ll be nudged to create a new wallet. During this process, you’ll receive a recovery phrase. This is a 12-word passcode that serves as your backup key. Now, remember that it is very vital to store this phrase securely, as it’s the only way to recover your wallet if you lose access to your device.

Securing Your Trust Wallet

Security is paramount when dealing with cryptocurrencies. Trust Wallet offers multiple layers of protection to ensure that your assets remain safe. Start by enabling biometric authentication (like fingerprint or face recognition) and setting a strong passcode. These features add an extra layer of security, making it difficult for unauthorized users to access your wallet.

Additionally, regularly update your app to benefit from the latest security patches and improvements. Trust Wallet’s development team continuously works to enhance the app’s security, so staying up-to-date is essential. To add to that, you can consider using a hardware wallet in conjunction with Trust Wallet for added security, especially if you’re holding a significant amount of crypto.

Trust Wallet Features

Managing Multiple Wallets

One of the standout features of Trust Wallet is the ability to manage multiple wallets within a single app. This feature is particularly useful for users who want to separate their assets for different purposes, such as investments, savings, or day-to-day transactions. To create a new wallet, simply navigate to the settings and select “Wallets,” then click the “+” icon. You can label each wallet for easy identification. Switching between wallets is seamless, allowing you to manage your crypto assets more efficiently.

Exploring Supported Cryptocurrencies

Trust Wallet supports a vast array of cryptocurrencies, including popular coins like Bitcoin (BTC), Ethereum (ETH), and Binance Coin (BNB), as well as a wide range of ERC-20, BEP-20, and other tokens. This extensive support makes Trust Wallet a versatile tool for crypto users who wish to diversify their portfolios. To add a new cryptocurrency to your wallet, navigate to the main screen and click on the “+” icon. You can then search for the specific cryptocurrency and add it to your list. Once added, you’ll be able to receive, send, and store that cryptocurrency directly in your Trust Wallet.

Staking and Earning with Trust Wallet

Did you know that you can earn rewards by staking certain cryptocurrencies directly from your Trust Wallet? Staking allows you to participate in the network validation process, and in return, you earn rewards. Trust Wallet supports staking for several cryptocurrencies, including Binance Coin (BNB), Tezos (XTZ), and Tron (TRX).

To start staking, go to the specific cryptocurrency in your wallet and look for the staking option. You can then choose the amount you want to stake and begin earning rewards. Staking is a great way to increase your holdings without actively trading. However, it is advisable to be mindful of the staking periods and any potential lock-up times, as these can vary between different cryptocurrencies.

Using Trust Wallet for Decentralized Finance (DeFi)

Trust Wallet isn’t just for storing and sending crypto—it’s also a gateway to the exciting world of decentralized finance (DeFi). Through the built-in DApp browser, you can access a variety of decentralized applications directly from your wallet. This includes platforms for decentralized exchanges (DEXs), lending and borrowing protocols, yield farming, and more.

To explore DApps, simply open the browser within Trust Wallet and start browsing the available options. Make sure to connect your wallet only to trusted DApps to avoid potential scams. Always double-check the URLs of the DApps you’re using to ensure you’re connecting to the legitimate platform. You can also bookmark your favorite DApps for easy and secure access.

Conducting In-App Crypto Swaps

Trust Wallet’s in-app swap feature allows you to exchange one cryptocurrency for another without leaving the app. One rookie mistake that newbies make is to miss out on constant vigilance. So, keep an eye on transaction fees, as these can vary depending on network congestion and the specific cryptocurrencies involved.

This feature is powered by various decentralized exchanges and provides users with the convenience of trading within their wallets. Whether you’re looking to diversify your portfolio or react quickly to market changes, the swap feature is a handy tool. To perform a swap, select the “Swap” option within the app, choose the currencies you want to exchange, and review the transaction details before confirming. The process is quick, and you’ll receive your new assets directly in your wallet.

Maximizing Security with Trust Wallet’s Multi-Layer Protection

Trust Wallet offers multiple security features that users should leverage to protect their assets. Besides setting up a strong passcode and enabling biometric authentication, regularly monitoring your transactions and being aware of potential phishing attempts can further safeguard your investments. Always ensure you are downloading the app from the official Trust Wallet website or authorized app stores to prevent falling victim to scams.

Trust Wallet Security

Conclusion

Trust Wallet is not only a secure choice for managing your cryptocurrencies but also a robust platform for exploring the broader crypto ecosystem. By understanding its features and implementing strong security practices, you can make the most of your crypto journey while ensuring your assets remain protected.

Best Crypto Hardware Wallets to Lock Down Your Assets

0

This Content Is Only For Subscribers

Please subscribe to unlock this content.